Outfitting (make that
Infitting) your whitewater canoe
Introduction
Do you enjoy whitewater canoeing but don't appreciate all the excess
H2O when creeking or playing? Would you prefer
to avoid a system with straps, d-rings or patches? Do you have a new
canoe that comes with a full length saddle
and foam components and want to know how to put it all together? If you
answered "yes" to any of these
questions then this information may be helpful to you!
Boats availible from Robson, Pyranha, and Savage have utilized a full
length saddle/thighook system since their
inception. The origin of this system goes back to steep creekers like
David "pyscho" Simpson, and is
used by 2 time world rodeo champion Eli Helbert.
For rodeo and creeking this system is ideal as it maximizes control, is
easy to jump in and out of (ingress/egress)
and provides additional bouancy and stability when full of water. This
system may be applied to ABS hulls as well.
If you tend to play hard and paddle where there are bigger drops, holes
and less places to empty then this information
may be helpful to you.
WARNING; Whitewater paddling is an extremely dangerous activity. Some
of the information given can "increase"
the difficulty to exit your boat. Never count on your roll, and always
make sure you can get out of your boat in
the event of an emergency. Enjoy and paddle safely.
Getting Started---things you'll
need
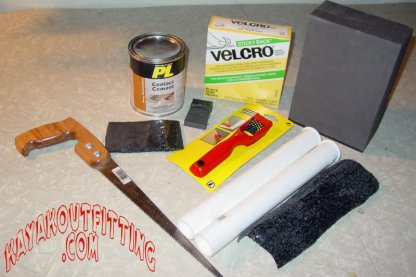
For starters you will need minicel foam. Kayakoutfitting.com has many
sizes and styles of foam to choose from.
For cutting minicel a bandsaw is ideal, but a hacksaw blade, or small
saw will work in it's place. To shape minicel
a sureform or dragonskin works very well. Various grades of sandpaper
can be used to smoothly finish things off.
Putting it all together requires contact cement or adhesive backed
velcro. PVC tubing of 1-1/2" should be
used to make the transfer tubes. These items are availible at most
hardware or homesupply stores.
Lastly...."patience". Hurrying the process typically results in pieces
that fit you and the boat incorrectly.
Take your time and reap the rewards, and enjoy.
Step One
Tear Down-- First you'll need to take that brand new boat apart. Untie
the airbags and lacing, remove the thwarts,
saddle and thighooks.
Knee Pads--before you can do anything else determine the thickness of
your desired kneepads. Have the pieces to
use in your boat loosely to determine saddle height and thighook
placement. I would recommend going at least 1/2"
for comfort. Velcro works well here because eventually mincel crushes
and needs replacement and tearing it off
and adding a new piece can be done more easily.
--------------------------------------------------------------------------------
Step
Two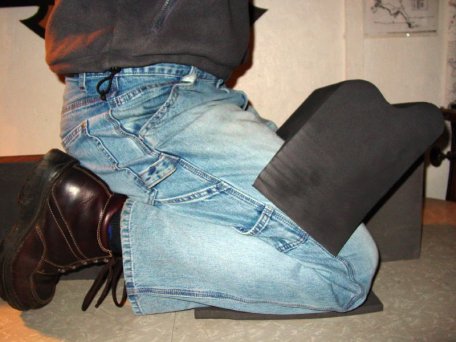
--------------------------------------------------------------------------------
Saddle--Choosing your saddle height and cut is crucial in my opinon. I
would recommend a saddle that is high enough
to afford comfort, but low enough to maintain a good center of gravity.
(I am 5'-10" tall with a 31"
inseam and prefer my saddle height between 8-3/4"-9". ) Note**
"everyone" has different leg
dimensions... hips to knee's, knee's to ankles, etc. Be extremely
choosy here!, you can always remove foam but
adding it back on isn't much fun. Level front to back isn't necessary
either. A little less under your butt is
ergonomically correct. Adding a piece between your lower back/butt and
the saddle also helps to raise the bow with
a good lean back.
Center your saddle/thighook combo in the water with someone to tell you
when your trim is correct. Bow forward=
wet but easier initaition on moves when playing. Centered= "ideal" for
general paddling in most situations.
Bow light= not good... don't ever go past center.
On Pyranha and Savage boats make sure you glue the plastic plates to
the saddle that the pegs mount to. If you
do not they will tear the saddle in time.
One drawback to a full length saddle is that the water doesn't always
transfer evenly from side to side. Using
a few pieces of PVC tubing pushed through the saddle resolves this
problem. Simply push the tubing through the
saddle 3" up from the bottom in a twisting motion, remove the foam
plug, and cut it off flush. It is advisable
to do this in three locations--ahead of the knees, under your crotch,
and above the feet. DO NOT cut foam from
beneath the saddle as this is a crucial contact area with the hull and
a suseptible place to break the foam saddle.
Step
Three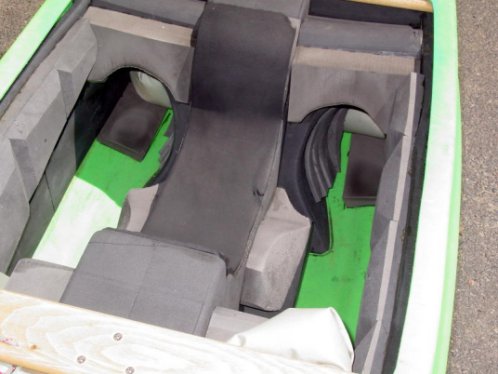
--------------------------------------------------------------------------------
Thighooks/Bulkhead--This is the "key" to the system. If placed
correctly you will be stable, in control,
and locked in while vertical or upsidedown. If placed incorrectly you
will not be "attached" to the hull,
and have a harder time rolling or using the boats designed abilities.
To determine the best placement for your thighooks here are some
important things to consider. How tight do I want
to be? Will I want the fit to be tighter later? Will I be able to get
in and out with ease?
For a snug fit use these guidelines. Once you have determined the
size/thickness of your kneepads and saddle height
you can now determine the proper placement of the thighooks. Ignoring
the lower cut from the factory set the angle
so the inside top of the hooks are on top of your thighs snugly. (I
prefer the hooks to be closer to my crotch
than knees, and you can always add pieces to the front or back of them
if you want more coverage.) Mark the blocks
on the saddle and sidewalls with a marker. Glue the thighooks to the
saddle first, outside of the boat, before
installing the saddle/thighook combo. Glue the saddle and thighooks to
the hull, making sure all of your marks
are lined up. Glue or velcro the outer thighooks to the sidewall foam.
(Tip trick; use two pieces of wood cut 2"
longer than your thwarts to open up the hull before gluing the outer
thighooks, when you are ready to attach the
outer sides remove the wood. This will give you the room you need to
work.)
For a looser fit put less coverage on your upper thigh with the hooks.
You can always glue pieces of minicel to
the inside of them to tighten yourself up as you become more
comfortable with the boat, and the confidence in your
roll.
Proper knee block alignment. Notice the angle on the top of the leg,
this gives you a "tighter" fit.
--------------------------------------------------------------------------------
Step
Four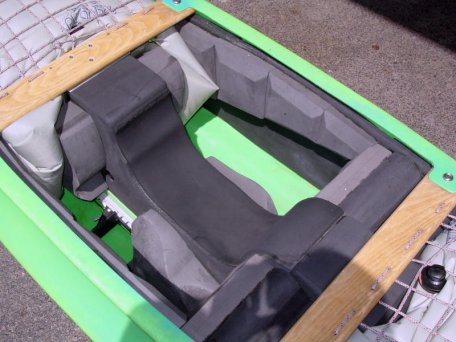
--------------------------------------------------------------------------------
Adding On-- For maximum displacement and retention you may want to
"add-on". (Reminder- adding foam in
specific areas can increase the difficulty to exit your boat in "any"
situation.)
Sidewalls-- Although Robson, Pyranha and Savage boats come with
sidewall foam oftentimes a little more is better.
Adding 1-1/2" thick pieces is simple and should not inhibit entry/exit.
Sitting inside the boat find the line
where your body does not contact the sidewalls and draw a line. Using
heavy construction paper or cardboard make
a pattern to replicate on your foam block. Cut the foam in one whole 3"
thick piece. You should have more
foam at the rear of the sidewall than the front. (About 30 degrees give
or take.) Cut the piece in half down the
middle. Glue or velcro to the existing sidewall foam. You may find it
better to taper the piece deeper in the rear
than the front, as not to inhibit your legs near the thighooks.
For boats that don't have sidewall foam, a molding gauge works well for
getting the contour of the inside of the
hull. You can replicate the shape on your foam pieces, then cut and
attach (a bandsaw is ideal for this).
Saddle-- You can add foam that will aid in displacement in three areas
of your saddle. The first area is what has
been cut away by the maufacturer where you aren't sitting on top of the
saddle. Cut pieces for the front and rear
of where you sit, so that you fit snugly but can still get in and out
or roll without hitting them. The second
is a void area between the thighook/bulkhead area and where your feet
are along the bottom of the saddle. Adding
pieces here helps displace water to the outer/lower edges of the hull.
Make sure "not" to inhibit the
area where your feet/ankles are. Lastly is the area above the footpegs
and behind your butt. Adding pieces to both
sides in this area will move the water more to the center and outer
edges. Note** Be "sure" to leave
room to adjust your footpegs and allow for entry/exit without trapping
your feet or legs.

![]()
