Outfitting tips
Late model Dagger playboats
The seat towers on these boats were designed to allow for easy adjustment. They have a few advantages in that they are pretty light, there are no bolts on top to scrape your hands, and the seat is easy to adjust. On the negative side they present a challenge to the uninitiated when you are installing a hip pad because the tower does not go all the way to the top of the boat.
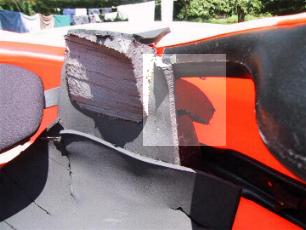
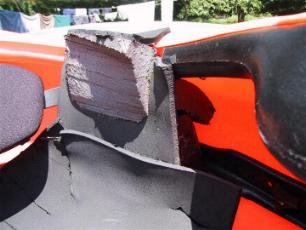
There is a full size picture at the bottom of the page.
1.Basically you want to fill the gap with any rough cut piece. Don't
let the glue on this piece dry completely.
You want it is still wet enough to slide into place. Make this piece
come flush with the outside edge of the tower.
This area has been highlighted in the picture below. Click the pic to see it bigger
2. Glue a thin piece of foam all the way from the base of the tower to the top of the boat. Don't hesitate to glue onto the inside of the cockpit rim. There will be some gaps on the backside around your rough cut piece but don't sweat it. You will have enough overall surface area to work around any flaws in your contact surface.
It is worth saying again to drive the point home: Its ok and beneficial to use the inside of the cockpit rim and the top of the cockpit rim as a gluing surface. By doing so you will not affect the way the sprayskirt fits or seals.
3. Sit in the boat and cram some triangle shaped pieces down past your hips to determine where they should be glued. These will be the workhorse part of the pads. Glue em in and shave as needed.
4. Cut the top of these pieces off so that you have a level surface from the top of the cockpit rim straight across. Now glue a thin piece of minicel from the outside edge of the cockpit rim across the pad and trim away any overhanging edges. This piece will add considerable strength and will keep the pads from getting ripped out as often. Again remember is it not a sin to glue to the cockpit rim top.
This area has been highlighted in the picture below.
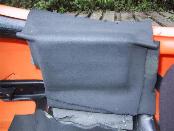
5. Trim out the whole shebang with thin neoprene foam to cover up all yo' sloppy work and to add some nice grip to the whole setup. (this has not been done yet in the picture)
Below is what the pad looks like with some 1/8th inch neoprene slapped over it so the whole project doesn't look ghetto. The thinner your covering piece the better it will conform to all of the curves.
![]()